
How to Repair Rusted Wheel Arches
Is your vehicle looking a bit unsightly due to rusting wheel arches? Learn how to repair them here and get your car back in tip-top shape!

When you shop through retailer links on our site, we may earn affiliate commissions. Learn more
Corrosion poses a significant threat to metal, and this is particularly critical for your automobile. Neglected, rust can swiftly extend across the wheel arch, resulting in unattractive blemishes and, in some cases, compromising the integrity of your vehicle's sheet metal. The ability to address rust issues in wheel arches is a fundamental skill for any car owner, essential for preventing potential mechanical concerns and preserving your vehicle's value. We'll explore various techniques for restoring deteriorated car wheel arches, restoring them to a pristine condition.
IN THIS ARTICLE
What Causes Wheel Arches to Rust?How to Identify Rust Damage on Wheel Arches
Step-by-Step Guide to Repairing Rusted Wheel Arches
FAQs
What Causes Wheel Arches to Rust?
Rust formation in wheel arches is often the result of exposure to moisture, road salt, dirt, and debris. These elements, combined with environmental factors and neglect, create an environment conducive to corrosion. Additionally, scratches and chips in the protective coatings can leave the metal vulnerable to rust, particularly when subjected to road debris.
Regular maintenance, including cleaning, applying protective coatings, and addressing any scratches or damage, is crucial for preventing or mitigating rust in wheel arches. Timely intervention is essential, as unchecked rust can compromise the structural integrity of the vehicle and affect its overall appearance and value.
Related Articles
How to Identify Rust Damage on Wheel Arches
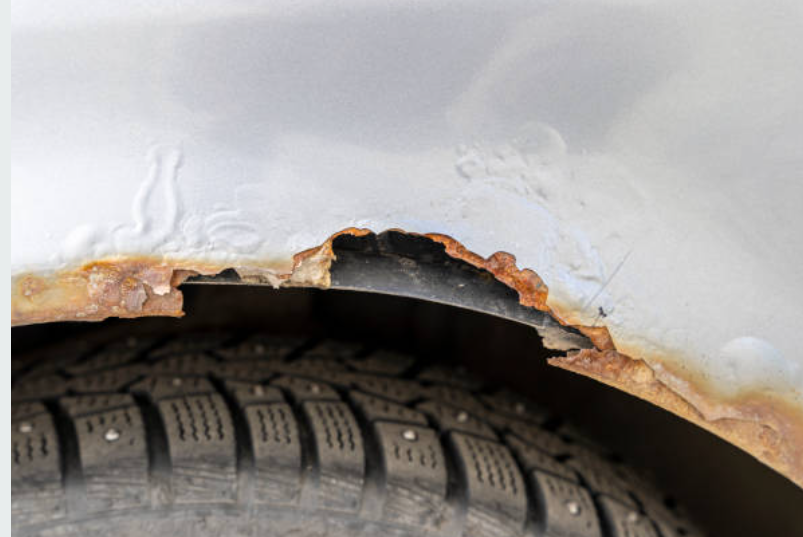
Detecting rust damage on your vehicle's wheel arches is a vital aspect of car maintenance. A visual inspection is the initial step, where you search for reddish-brown or orange spots, bubbles, blisters, peeling paint, discoloration, and irregular surface texture. Your sense of touch can also be a valuable tool, as rust-damaged areas often feel rough compared to smooth, non-corroded metal.
For advanced rust, watch out for holes and pitting. A distinctive dull or hollow sound when tapping the area can also indicate rust. If in doubt, consider seeking professional assistance or inspecting the inner side of the wheel arches from beneath the vehicle.
Early identification of rust is essential for timely intervention, preventing further corrosion, structural issues, and preserving the vehicle's appearance and value. Regular care and protective measures can help extend the life of your wheel arches and keep rust at bay.
Step-by-Step Guide to Repairing Rusted Wheel Arches
Required Supplies and Equipment:
- Safety gear
- Wire brush or sandpaper
- Rust converter (phosphoric acid-based)
- Rust inhibiting primer
- Body filler
- Sandpaper (various grits)
- Paint (matching your vehicle's color)
- Clear coat
- Paint spray gun or aerosol spray cans
- Painter's tape
- Plastic sheeting or drop cloth
- Putty knife or body filler spreader
- Rags or paper towels
- Water and soap for cleaning
- Rust converter brush (if not included with the product)
Step-by-Step Guide:
1. Safety First:
- Start by putting on your safety gear to protect yourself from any harmful materials.
2. Prepare the Work Area:
- Position your vehicle in a dry, well-ventilated location, and shield the adjacent areas with plastic sheeting or a drop cloth to avoid overspray.
3. Remove Loose Rust:
- Use a wire brush or sandpaper to remove any loose or flaking rust from the affected wheel arch areas.
4. Apply Rust Converter:
- Apply a rust converter according to the manufacturer's instructions. Typically, you'll use a brush or spray it on the rusted areas.
- The rust converter will chemically convert the rust into a stable, paintable surface. Allow it to dry as per the product's instructions.
5. Sand the Surface:
- Once the rust converter is dry, sand the entire wheel arch to create a smooth surface. Start with a coarse grit sandpaper and progress to finer grits until the surface is even and smooth.
6. Clean the Area:
- Wipe down the wheel arches with a clean, damp cloth to remove dust and debris.
7. Apply Rust Inhibiting Primer:
- Apply a rust-inhibiting primer to the sanded area to further prevent rust from returning. Follow the primer manufacturer's instructions regarding drying times.
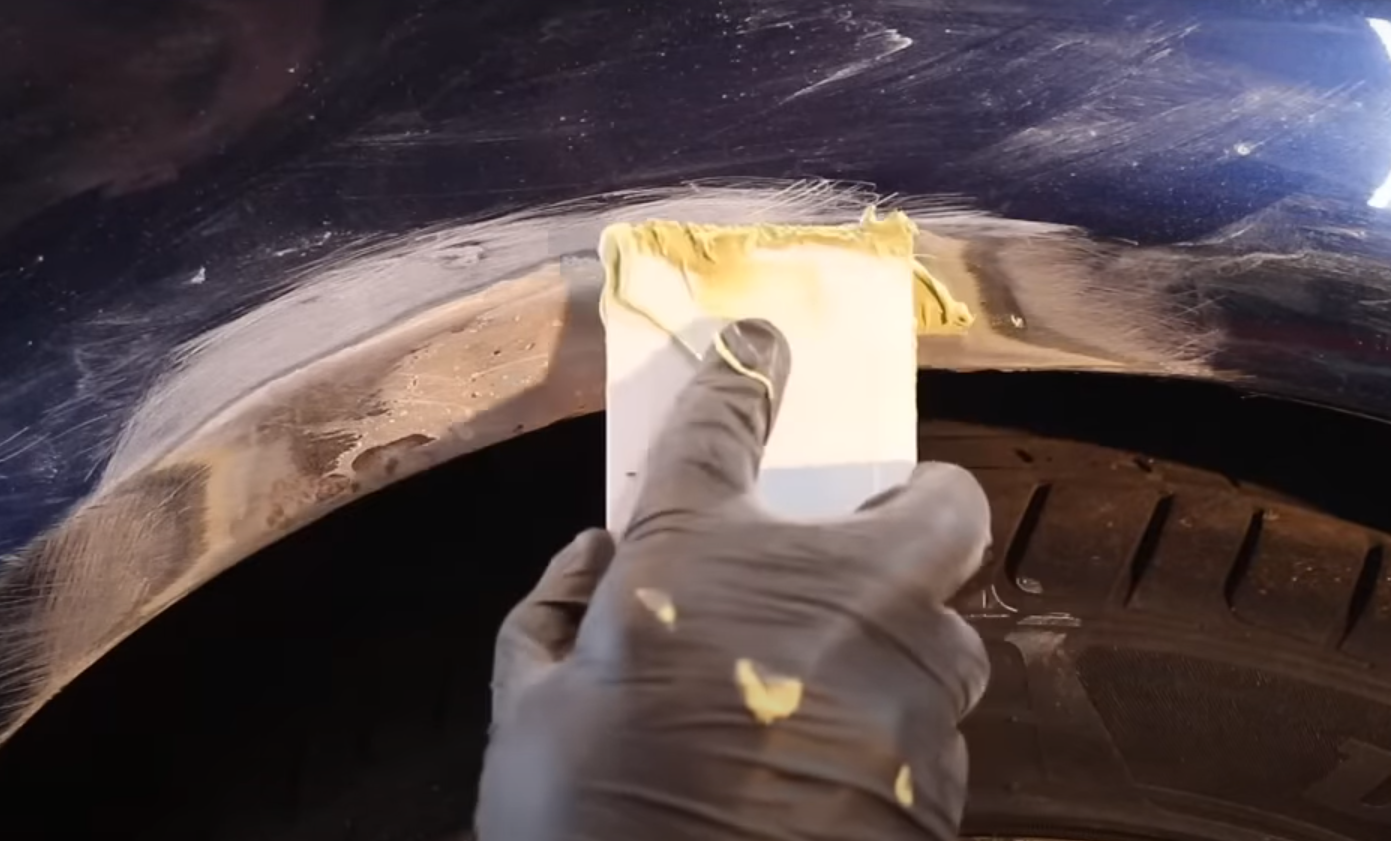
8. Apply Body Filler (If Necessary):
- If there are deep rust holes or dents in the wheel arch, you may need to apply a body filler. Follow the manufacturer's instructions to apply, shape, and smooth it with a putty knife or body filler spreader.
9. Sand the Filler:
- Once the body filler is dry, sand it until it's smooth and blends with the surrounding metal.
10. Clean and Mask Off:
- Clean the entire wheel arch area again to remove any dust and debris.
- Use painter's tape to mask off the surrounding areas to protect them from overspray.
11. Apply Paint:
- Apply a primer coat to the repaired area and allow it to dry.
- Then, apply the base coat of paint that matches your vehicle's color. You can use a paint spray gun or aerosol spray cans for this step. Apply multiple thin coats, allowing each one to dry before the next.
12. Apply Clear Coat:
- Once the base coat is dry, apply a clear coat to protect the paint and give it a glossy finish. Apply several thin coats, following the drying instructions on the product.
13. Remove Masking and Final Inspection:
- Carefully remove the painter's tape and inspect the repaired area. Ensure it matches the surrounding paintwork and has a smooth finish.
14. Clean Up:
- Clean your tools and dispose of any waste materials properly.

FAQs
-
What are some common causes of rust on wheel arches?
Rust on wheel arches is often caused by exposure to moisture, road salt, and environmental contaminants. It can be accelerated by minor scratches, stone chips, or paint damage that expose the metal to these elements.
-
How long does the entire process of repairing rusted wheel arches take?
The time required for the repair process depends on factors such as the extent of rust, your proficiency, and the drying times of the products utilized. Completing all the steps, including allowing coats of paint to dry, may span several days.
See another review here: The 10 Best Paints For Plastic


