
How To Test A Relay?
Master relay testing with our guide. Learn step-by-step methods for diagnosing electrical issues in your vehicle's system effectively.

When you shop through retailer links on our site, we may earn affiliate commissions. Learn more
As a car ages, various electrical issues can emerge, ranging from faulty terminals and damaged wires to blown fuses and malfunctioning relays. Being able to identify and troubleshoot these issues can mean the difference between frustration and successful resolution under the hood.
Moreover, modern cars are becoming increasingly intricate. Nearly every aspect of newer vehicles incorporates some form of electrical or computerized system. Relays are commonly employed to manage high-current components, but their mechanical nature means they are susceptible to wear and failure over time. When these components malfunction, they can present perplexing challenges for diagnosis and repair.
IN THIS ARTICLE
The Highest Priority SafetyEverything You Need To Test A Relay
How To Test a Relay? Step by Step
Common Signs of Relay Failure
Preventive Maintenance Tips for Relays
FAQs
Final Thoughts
The Highest Priority Safety
Working on your vehicle entails inherent risks. From moving parts to electrical hazards, it's crucial to prioritize safety. Here are some fundamental safety tips:
- Exercise caution when dealing with electricity to avoid shocks.
- Avoid working in environments with flammable materials to prevent potential ignition.
- Always consult your vehicle's safety manual and a reliable repair guide before proceeding with any work.

Related Articles
Everything You Need To Test A Relay
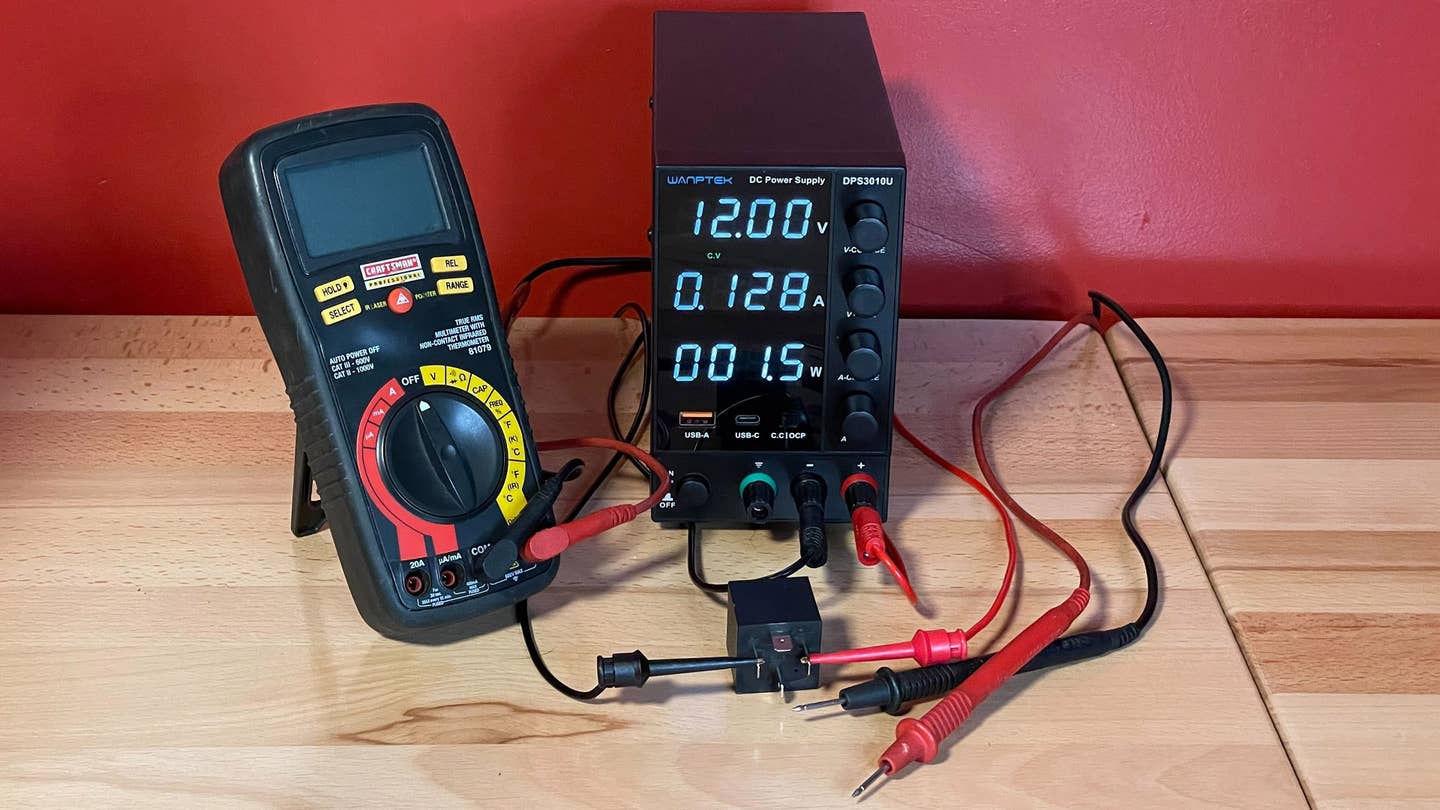
Testing a relay is a relatively straightforward process that can be done with minimal equipment. Here's a comprehensive list of tools and parts required for relay testing:
- Benchtop power supply
- Multimeter
- Alligator clips
- Test leads
- Test relay (optional, for testing on a new part)
How To Test a Relay? Step by Step
Step 1: Understanding How a Relay Works**
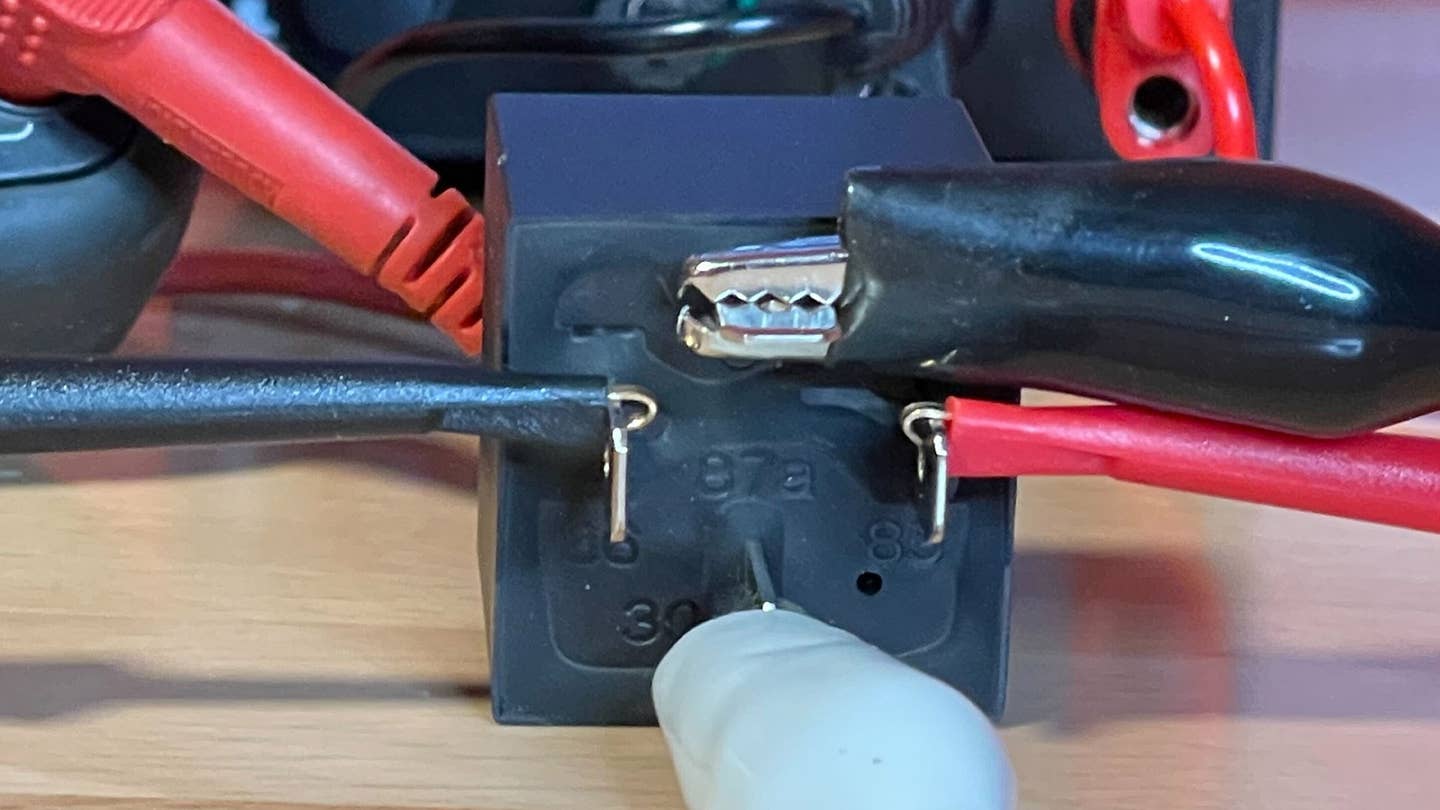
Before delving into relay testing, it's essential to grasp its functionality. We'll focus on the operation of a typical four-pin relay configured as a normally open single-pole single-throw (SPST). Understanding the pin configuration is vital.
30: From battery +
85: Relay Coil
86: Relay coil +
87: Common contact
Step 2: Locate the Relay
Finding the relay to test is the initial step. Relays can be situated in various locations within the vehicle, such as under the hood, in the fuse box, or under the dash. Consulting a vehicle-specific repair manual or wiring diagram is recommended to pinpoint its location accurately.
Step 3: Swap Out the Relay
If feasible, swapping out the relay with a known-working unit is a quick method for testing. However, addressing the root cause of the relay failure is crucial to prevent recurring issues.
Step 4: Measure the Resistance
Using a multimeter, measure the resistance across the electromagnetic coil terminals (pins 85 and 86). A reading between 50 and 120 ohms typically indicates a functional coil.
Step 5: Test Switch Pin Continuity
Check for continuity between the switch pins (typically 87 and 30). There should be no resistance, indicating an open circuit. Any resistance suggests a faulty relay.
Step 6: Test the Energized Relay
Apply power to the coil pins and listen for the audible click indicating the relay's activation. Test for continuity between the switch pins using the multimeter's continuity setting. The absence of continuity indicates a defective relay.
Step 7: Test the Voltage
Verify that the relay delivers the correct voltage on the switched end. Measure the voltage on the switch pin without any wires attached. Any deviation from the expected voltage may signify a relay malfunction.
By following these steps meticulously, you can effectively diagnose relay issues in your vehicle's electrical system, ensuring optimal performance and safety on the road.
Common Signs of Relay Failure
Recognizing the symptoms of relay failure can help you identify when testing may be necessary. Here are some common signs to watch out for:
- Electrical Malfunctions: If your headlights, turn signals, or other electrical components start behaving erratically or stop working altogether, it could indicate relay failure.
- Clicking Sounds: A clicking noise coming from the relay itself or the area where it's located might indicate a malfunctioning relay trying to activate.
- Intermittent Operation: Relays that are on the verge of failure may cause intermittent operation of the components they control. This can manifest as lights flickering or accessories turning on and off unexpectedly.
Preventive Maintenance Tips for Relays
To minimize the risk of relay failure and ensure the longevity of your vehicle's electrical system, consider implementing these preventive maintenance measures:
- Regular Inspection: Periodically inspect relays for signs of corrosion, overheating, or physical damage. Addressing issues early can prevent more significant problems down the line.
- Keep Connections Clean: Clean and tighten electrical connections regularly to prevent poor conductivity, which can put strain on relays and lead to failure.
- Replace Aging Relays: As part of routine maintenance, consider replacing relays that are approaching their expected lifespan, even if they haven't shown signs of failure yet.
- Use Quality Parts: When replacing relays or any electrical components, opt for high-quality parts from reputable manufacturers to ensure reliability and longevity.
FAQs
1. Can I test a relay without any special equipment?
Yes, relay testing can be done with minimal equipment such as a multimeter. However, for more comprehensive testing, a benchtop power supply may be necessary.
2. How do I know if my relay needs testing?
If you're experiencing electrical issues in your vehicle, such as malfunctioning lights or accessories, it's worth considering relay testing as a diagnostic step.
3. What if I can't locate the relay in my vehicle?
Consulting a vehicle-specific repair manual or wiring diagram is recommended for accurately locating the relay within your vehicle.
4. Is relay testing dangerous?
While relay testing itself isn't inherently dangerous, working on vehicles involves certain risks. Always prioritize safety and take the necessary precautions when handling electrical components.
Final Thoughts

Maintaining peak performance and safety while driving depends on your ability to identify and fix electrical problems in your car. Knowing how to test a relay gives you the ability to spot possible issues and respond appropriately. You can safely identify relay problems and guarantee the dependability of your car's electrical system by following the instructions in this handbook and putting safety first. Gaining proficiency in relay testing techniques can be beneficial for both professional mechanics and do-it-yourself enthusiasts, as it can ultimately save time, money, and frustration. Maintain your vehicle's functionality, be knowledgeable, and be safe.
Click on the following link to read another blog post: How To Ascend A Steep Hill?


