
How to Remove Window Tint
Get your windows in shape and save on tinting services with our step-by-step guide on how to remove window tint. Learn the basics of DIY window tint removal now!

When you shop through retailer links on our site, we may earn affiliate commissions. Learn more
While window tint serves to boost privacy and shield against UV rays, situations may arise necessitating its removal. Whether prompted by wear and tear, bubbling, or a shift in personal preference, acquiring the skill of removing window tint proves valuable. This detailed guide will guide you through each step of the process, guaranteeing a seamless removal free of residue.
Step by Step to Remove Window Tint
Before you start the process, ensure you have these materials at hand:
- Hairdryer or heat gun
- Razor blade or a window scraper
- Soap and water solution
- Soft cloth
- Protective gloves
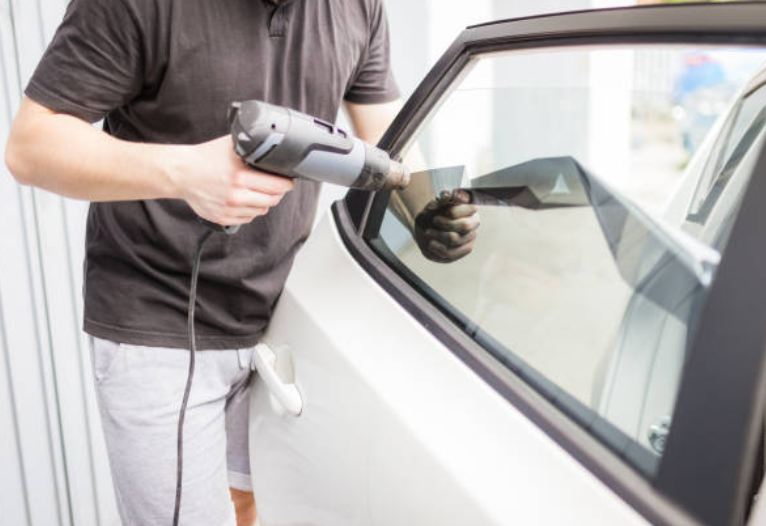
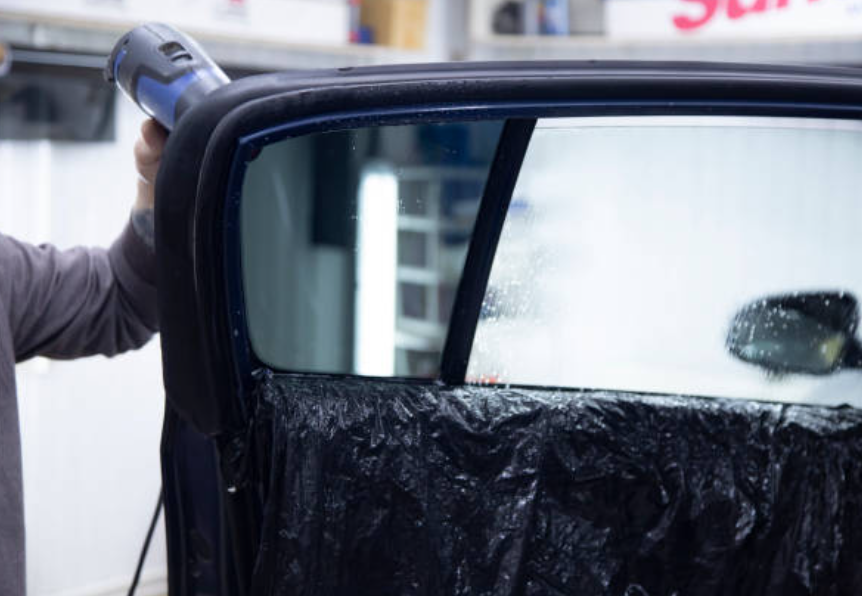
Step 1: Heat the Window Tint
Initiating the window tint removal process begins with the application of heat, effectively weakening the adhesive binding the tint to the window. Utilize either a hairdryer or a heat gun for this task. Set the hairdryer to high heat and maintain a distance of approximately two inches from the window. Move the appliance gradually, ensuring even heating across the entirety of the window tint.
Step 2: Start Peeling Off the Tint
After heating the tint, gently begin peeling it off from a corner using your fingernails or a razor blade. Be careful not to scratch the glass. The aim is to peel off the tint in large pieces rather than small shreds. If the tint starts to break apart, reapply heat to soften the adhesive further.
Step 3: Clean Remaining Adhesive
In certain instances, adhesive residue might persist on the window following the removal of the tint film. To address this, spritz a solution of soap and water onto the window and meticulously eliminate the residue using a razor blade or window scraper. Exercise caution to keep the blade flat against the glass, preventing any scratches.
Step 4: Final Cleaning
After completely removing all adhesive, perform a final cleaning of the window using a solution of soap and water. Wipe it down with a soft cloth to ensure there are no lingering residues. Your window is now clear and devoid of tint.
Related Articles
Safety Tips
It is crucial to prioritize safety during the window tint removal process. Always wear protective gloves when handling a razor blade or window scraper to minimize the risk of injuries. Exercise caution to avoid using excessive force during the adhesive scraping phase, as this prevents potential damage to the window.
Moreover, make certain you are operating in a properly ventilated space since the heating process can emit fumes from the adhesive. Although the process of removing window tint may appear somewhat laborious, armed with the appropriate tools and patience, it becomes a task you can effectively manage independently. Remember to take your time and follow these steps meticulously for the optimal and safest results.
FAQs
-
Is it possible to reuse the removed window tint?
Reusing window tint is challenging due to the adhesive residue left on the film during removal. It's more practical to install new tint for optimal performance.
-
Can I remove window tint from other surfaces besides car windows?
The process can be applied to other glass surfaces, but it may not be suitable for non-glass materials. Always check compatibility before attempting removal.
See more review here: The 10 Best Snowmobile Lifts To Elevate Your Snowmobiling Experience


