
How to Install Car Speakers
Find out all you need to know and get step-by-step instructions on how you can install car speakers in your vehicle with ease.

When you shop through retailer links on our site, we may earn affiliate commissions. Learn more
Are you looking to revamp your vehicle's look while elevating your music experience? Installing new car speakers is the ideal method to not only enhance your car's aesthetics but also upgrade its audio system. Better yet, the installation process is straightforward and accessible to everyone. Continue reading to discover our step-by-step guide on how to install car speakers, setting the stage for a stylish and sonorous journey ahead.
IN THIS ARTICLE
What You Need to Know Before Installing Car SpeakersStep-by-Step Guide to Installing Car Speakers
Troubleshooting Common Issues with Car Speaker Installation
FAQs
What You Need to Know Before Installing Car Speakers
Before you embark on the exciting journey of installing new car speakers, it's crucial to be well-prepared. Start by verifying the compatibility of your chosen speakers with your vehicle's make and model. Select speakers that align with your audio preferences, considering factors like music genre and desired sound clarity.
Ensure you have all the necessary tools at your disposal, from screwdrivers to wire strippers and crimpers. Checking for wiring harness adapters can simplify the process. Safety is paramount, so disconnect the car battery's negative terminal before starting any electrical work. Review the manufacturer's installation instructions thoroughly and plan your installation strategy, including speaker placement and wiring routes.
If you're aiming for optimal audio quality, consider adding soundproofing material to your car doors. By addressing these key preparations, you'll pave the way for a successful car speaker installation that elevates your in-car audio experience to a whole new level.
Related Articles
Step-by-Step Guide to Installing Car Speakers
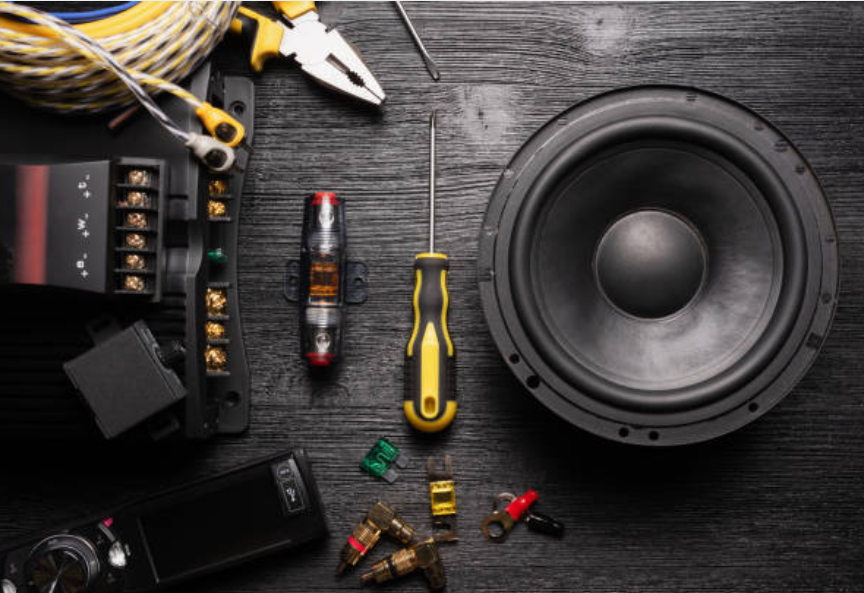
Step 1: Gather Your Tools and Materials
- New car speakers
- Screwdrivers (Phillips and flathead)
- Wire stripper and crimper
- Wire connectors
- Crimp caps or soldering iron and solder
- Wiring harness adapter (if necessary)
- Panel removal tools
- Electrical tape
- Drill and drill bits
- Wire cutters
- Socket wrench set
- Mounting brackets (if not included with your speakers)
- Speaker grille covers (if needed)
Step 2: Prepare Your Vehicle
Start by disconnecting the negative terminal of your car's battery to ensure safety during the installation process. This step prevents accidental electrical shorts while working with the wiring.
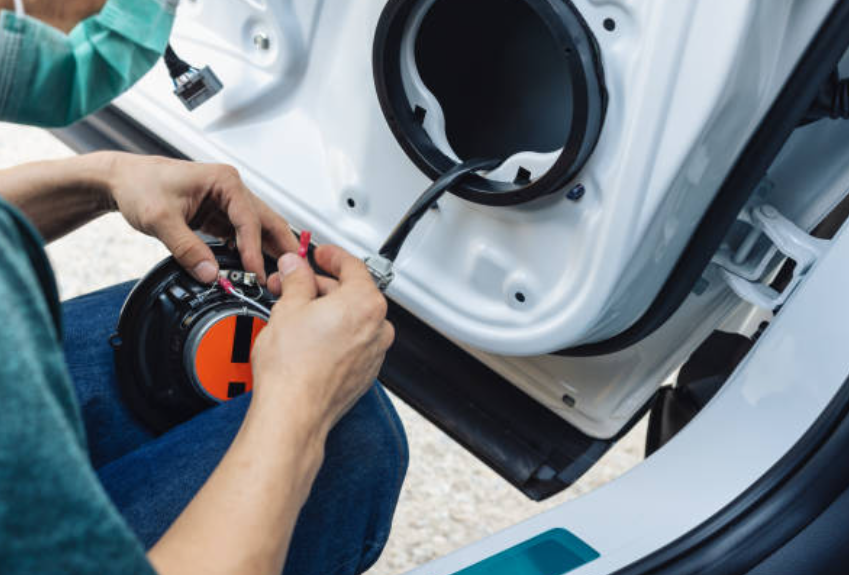
Step 3: Remove Door Panels or Speaker Grilles
Depending on your car's make and model, you may need to remove the door panels or speaker grilles to access the existing speakers. Use your panel removal tools to carefully pry them off. Be cautious not to damage any clips or screws in the process.
Step 4: Remove Old Speakers
Once you have access to the old speakers, remove them by unscrewing them from their mounts. Carefully disconnect the wiring harnesses attached to the speakers.
Step 5: Prepare the Wiring
Trim the wiring connected to the old speakers, ensuring you retain adequate length for linking them to your new speakers. Strip the wire ends and secure them by affixing crimp connectors or soldering them to your new speaker's wiring. Pay close attention to polarity, ensuring a proper match between positive and negative terminals.
Step 6: Mount the New Speakers
If your new speakers come with mounting brackets, use them. Otherwise, you may need to use the old speaker's brackets or fabricate your own. Secure the new speakers in place using screws or bolts.
Step 7: Connect the Wiring
Attach the wiring harness from your car to the wiring on your new speakers. Ensure a secure connection using crimp caps or soldering. Use electrical tape to insulate the connections.
Step 8: Test the Speakers
It is critical to perform a functional test on the new speakers before completing the reassembly procedure. Begin by reconnecting the car's battery and activating the audio system to confirm that the sound output works properly. This step ensures that the speakers were successfully installed.
Step 9: Reassemble Panels or Grilles
If everything is working correctly, reassemble the door panels or speaker grilles. Make sure all clips and screws are properly secured.
Step 10: Enjoy Your Upgraded Sound System
Now that the new car speakers are in place and have been thoroughly tested, you can savor a superior audio experience during your journeys.

Troubleshooting Common Issues with Car Speaker Installation
1. No Sound or Low Volume:
Problem: You've installed the new speakers, but there's no sound or the volume is barely audible.
Solution: Check the wiring connections to ensure they are secure and properly matched (positive to positive, negative to negative). Verify that the head unit's balance and fade settings are correctly adjusted. Additionally, ensure that the speakers are compatible with your car's audio system in terms of impedance and power handling.
2. Distorted or Crackling Sound:
Problem: Your new speakers produce distorted or crackling audio.
Solution: Examine the wiring for loose connections or frayed wires. Ensure that the speakers are securely mounted and not vibrating against any surfaces. Adjust the balance and fade settings on your head unit to ensure that sound is evenly distributed.
3. Speaker Phasing Issues:
Problem: The speakers are out of phase, causing poor sound quality.
Solution: Verify again that the positive and negative terminals on the speaker cables are properly positioned and connected to the head unit and speakers. If the phasing issue persists, you may need to reverse the wiring for one speaker to achieve proper phasing.
4. Rattling or Vibrations:
Problem: The speakers produce rattling or vibrations when playing bass-heavy music.
Solution: Ensure that the speakers are securely mounted using appropriate brackets and screws. Consider adding soundproofing material to the door panels to reduce vibrations. Adjust the equalizer settings on your head unit to balance the bass frequencies.
5. Uneven Sound Distribution:
Problem: The sound is not evenly distributed across all speakers in your car.
Solution: Verify that the balance and fade settings on your head unit are properly calibrated. If the problem persists, it could be linked to the head unit's settings or wiring, and seeking professional assistance for diagnosis and resolution may be necessary.
6. Speaker Phase Issues:
Problem: The speakers are not in sync, resulting in subpar sound quality.
Solution: Confirm that the wiring is correctly connected, ensuring that positive and negative terminals match on both the head unit and speakers. If phase issues persist, consult the speaker's user manual or a professional installer for guidance.

FAQs
-
How do I choose the right speakers for my car audio system?
Consider factors such as speaker type (coaxial or component), power handling, sensitivity, and impedance to match your car's audio system and personal preferences. Research and read reviews to find speakers that fit your needs.
-
Is soundproofing necessary during speaker installation?
While not mandatory, soundproofing can enhance audio quality by reducing vibrations and external noise. Adding soundproofing material to doors or other speaker locations is a worthwhile consideration for improved sound clarity.
See more reiview here: The 10 Best Deer Whistles For Stay Safe On The Road


